Basic Concepts
MQTT:
• Important for constrained devices and unreliable networks.
• Used to send messages with very low overhead.
MQTT over WebSockets client:
• Enable a browser to send and receive MQTT messages.
• A browser that supports WebSockets can be MQTT client.
Requirements to develop MQTT WebSocket client Application:
1. A JavaScript library
2. MQTT broker (in our case broker=mqtt.item.ntnu.no, and port= 80)
Why WebSockets is Preferred:
• Bidirectional link
• Ordered
• Loss free (as WebSockets implement TCP)
Applications:
• Display live information from a device or sensor
• Receive push notifications, for example if there is an alert or critical condition
• See the current status of devices with LWT and retained messages
• Communicate efficiently with a mobile web application
MQTT Client can be:
• Publisher
• Subscriber or
• Both subscriber and publisher

Fig: Publishing and Subscribing messages via MQTT
Publisher Client:
• Publishes messages to the broker.
Message Contains:
* Topic: since MQTT filter messages based on the topic in the broker, this is a must.
* Payload: The actual data to be transmitted
* Qos: (0,1, or 2) which determines message guaranteed
* Retain-flag: Decides whether messages is saved or not.
* …and so on
Subscriber Client:
• As long as publisher client exists, subscriber client is mandatory so as to receive the published messages.
Message is subscribed using:
* packetId: unique packet Identifier
* Topic
* Qos.
Source Code:
A simple MQTT over Websocket Client (separate Publisher and subscriber client) is developed to illustrate the basic functionality of subscribing and publishing messages via MQTT. You are welcome to download the source code and extend the functionality.
mqtt-javascript
Explanation of the Source code
A. Javascript Code
1. Creating Connection
* Before performing the required fuctions, it is necessary to establish connection with the MQTT broker. As a result, using the host name and port number of the broker, and a random client ID, a client object (i.e, Messaging.Client) object is first created to set up the connection. The format is:
var client = new Messaging.Client(hostname, port, clientid);
- Following this, a set options are defined which describe the connection process. For example, we have set the timeout to be 3 sec, and if connection is unsuccesful an alerting indicating the connection failure will be popped up.
var options = { //connection attempt timeout in seconds timeout: 3, //Gets Called if the connection has successfully been established onSuccess: function () { alert("..."); }, //Gets Called if the connection could not be established onFailure: function (message) { alert("..."); } }; - Finally, the connect () method is called with the “options” argument using the object created.
client.connect(options);
Whenever the websocket/mqtt connection is disconnected for any reason, we can get the display the error message, like:
    client.onConnectionLost = function (responseObject) {
        //Depending on your scenario you could implement a reconnect logic here
        alert("connection lost: " + responseObject.errorMessage);
    };
2. Publishing Message
We have discussed above, the parameters that must be included while publishing messages. Hence, we have to create a Messaging.message object and pass it to the client’s publish method. By default, the published message is not saved, so we have included the retain option in our cases in order to subscribe the message latter on.
var sendmessage = function (urcomment, topic, qos, retain) {
    alert("Published");
    var message = new Messaging.Message(urcomment);
    message.destinationName = topic;
    message.qos = qos;
    message.retained = retain;
    client.send(message);
 }
3. Subscribing Message
Like Publishing a message, the parameters discussed in the previous section are passed as arguments. But unlike publishing, the subscribing is simply done by calling the subscribe method of the client object.
client.subscribe(Topic, {qos: 2});

Up on subscribing the message, we have to invoke the "onMessageArrived" parameter of the client, thus we can manipulate the received message. In our case, we have displayed the message on text box.

client.onMessageArrived = function (message) {
        //Do something with the push message you received
        $('#messages').append('Topic: ' + message.destinationName + '  | ' + message.payloadString + '<br/>');
        .
        .
        .
        };
** B. HTML Elements **
1. Publishing Client
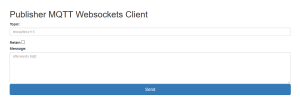
As explained earlier, an MQTT message is published using a particular topic. Hence, we need to prepare a an HTML textarea to receive user input both for the message Topic and payload. Additionally, a single checkbox is availabe to indicate whether the MQTT broker should save the message or not.
Once the message is entered, it is published by pressing the send button. The button is set to invoke the client’s publish method, and pass the message’s topic, payload, and retain status as an argument when it is clicked. For simplicity, we have set the QoS to be 2. Below is given the screeshot of the Publisher client webpage:

2. Subscribing Client
Like publisher client, the subscriber client reterives a particular message based on its topic. As a result, we have included a textarea to hold for the requested message topic. Moreover, we have added a single button (i.e., “subscribe” button) in the webpage. Upon pressing this button, the subscribe method of the client is called according with the topic entered and a specific QoS (in this case, QoS is set to be 2). After successful subscription, the reterived message is displayed on the textarea. The webpage for the subscriber client is shown below:

Reference;
MQTT Documentation
5,448 thoughts on “Developing MQTT Client”