Creating a simple MQTT client in JavaScript
This recipe contains a step-by-step guide to setting up and getting started with a simple MQTT client using HTML, JavaScript and CSS. For extended explanation of concepts and code using a similar code base, read this article.
Step 1
Download the source files from this link, and extract them to your computer. Make sure you don’t change the file structure.
Step 2
Open the file called index.html in your browser of choice, you should see this page:
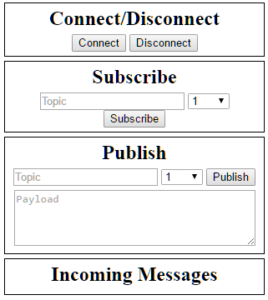
Using the client
Always start by pressing the Connect button. If you are not connected, nothing will work.
Note: The code provided connects to a public broker belonging to HiveMQ, if you want to change that, see “Changing settings” further down.
Subscribing
Enter the topic you want to subscribe to, choose a QoS (Quality of Service) value, and press the subscribe button. Incoming messages on the topics you are subscribed to, will be shown in the Incoming messages box.
Default fallback values:
Topic: ‘testtopic/#’
QoS: 1
Publishing
Very similar to subscribing, but here you will add a payload as well, which is the message you want to publish.
Default fallback values:
Topic: ‘testtopic/test’
QoS: 1
Payload: ‘test’
Changing settings
If you want to use a different broker, perhaps one you have set up yourself, or you want to change the fallback values, you will have to edit the settings found at the top of script.js.
You can change the look of the client in style.css.