This recipe shows the necessary steps to run Node-RED and MongoDB on a Raspberry PI 2 in order to gather data and make them available through an open API.
Specifications
- Raspberry PI 2 Model B, 1GB
- Raspbian Jessie on an 8GB SD
Node-RED related parts builds heavily on this guide.
Installation
Installing Node.js
First, make sure any possible old versions are removed:
$ sudo apt-get remove nodered
$ sudo apt-get remove nodejs nodejs-legacy
$ sudo apt-get remove npm
Second, install Node.js (including NPM)
$ curl -sL https://deb.nodesource.com/setup_4.x | sudo bash -
$ sudo apt-get install -y build-essential python-dev python-rpi.gpio nodejs
Verify installation by checking versions
$ node -v
$ npm -v
Installing Node-RED
$ sudo npm cache clean
$ sudo npm install -g --unsafe-perm node-red
Installing MongoDB
$ sudo apt-get install mongodb
Note: This will per 2016-03-10 install MongoDB v2.4.10 (latest release is v3.2). MongoDB does not support Raspberry PI’s architecture for its newest releases. If one wants to run the latest version of MongoDB, the solution is to compile it from source manually. This requires some fiddling and patience. However, when running non-security critical proof-of-concept solutions, the old version of MongoDB available in the Raspbian Jessie repository should be OK.
Installing MongoDB plugin for Node-RED
$ cd ~/.node-red
$ npm install node-red-node-mongodb
If the directory does not yet exist, starting an instance of Node-RED should create it:
$ node-red-pi --max-old-space-size=128
The reason for the --max-old-space-size=128 option is explained later. For more info on the MongoDB plugin, see the Node-RED library.
Configuration
Adding some Node-RED security
Without any configuration, a running Node-RED instance is open to anyone on the Internet at <The Raspberry PI’s IP>:1880. Not good! So before starting, we’ll add some basic security:
$ sudo npm install -g node-red-admin
$ node-red-admin hash-pw
This will prompt you for a password and give you the bcrypt encrypted version of your password. Copy this string for later.
$ nano ~/.node-red/settings.js
In this file, you should find an option called adminAuth that is commented out. It looks something like this:
adminAuth: {
    type: "credentials",
    users: [{
        username: "admin",
        password: "$2a$08$zZWtXTja0fB1pzD4sHCMyOCMYz2Z6dNbM6tl8sJogENOMcxWV9DN.",
        permissions: "*"
    }]
}
Uncomment this, paste your bcrypt string in the password field, save settings.js (CTRL + O), exit (CTRL + X) and you should be promted for a username and password when accessing <The Raspberry PIs IP>:1880 from another computer.
For more security options, see the Node-RED security guide.
Access-Control-Allow-Origin
If you plan on querying the Raspberry PI from other domains (i.e., not only from a webserver running on the PI, but e.g. from a website using AJAX queries), you will need to allow this explicitly in settings.js:
$ nano ~/.node-red/settings.js
Find the httpNodeCors option and make it look something like this:
httpNodeCors: {
    origin: "*",
    methods: "GET"
},
NB! This will allow all domains to make GET requests to your Node-RED instance.
Autostarting Node-RED
If you want Node-RED to start automatically on every boot and after crashes, run the following:
$ sudo wget https://raw.githubusercontent.com/node-red/raspbian-deb-package/master/resources/nodered.service -O /lib/systemd/system/nodered.service
$ sudo wget https://raw.githubusercontent.com/node-red/raspbian-deb-package/master/resources/node-red-start -O /usr/bin/node-red-start
$ sudo wget https://raw.githubusercontent.com/node-red/raspbian-deb-package/master/resources/node-red-stop -O /usr/bin/node-red-stop
$ sudo chmod +x /usr/bin/node-red-st*
$ sudo systemctl daemon-reload
After this, enable autostart by:
$ sudo systemctl enable nodered.service
Disable by:
$ sudo systemctl disable nodered.service
For a more comprehensive explanation of what these commands do, see section “Adding Autostart capability using SystemD” in the Node-RED guide
Running stuff
Starting MongoDB
$ sudo /etc/init.d/mongodb start
You can verify it’s running by trying to open a mongo shell:
$ mongo
Starting Node-RED
Node-RED requires some memory. Since Raspberry PIs generally don’t have too much of that, it is necessary to use the node-red-pi command when starting Node-RED on Raspberry PIs. When running this command, the max-old-space-size option should be specified. This will tell Node.js at what point to start freeing up unused memory:
$ node-red-pi --max-old-space-size=128
Node-RED is now running on 127.0.0.1:1880. Open this in a browser to see it.
Using the MongoDB plugin
MongoDB usually runs on 127.0.0.1:27017. To be able to insert/retrieve documents to/from a MongoDB database through Node-RED, you must first create a database and a collection. Start a MongoDB shell by:
$ mongo
In the shell, enter the following to create a database with a collection:
> use myDB
> db.myCollection.insert({})
Confirm the existence of the database and the collection by:
> show dbs
> show collections
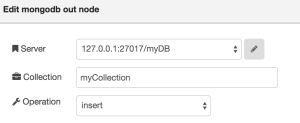
You can now create a mongodb node in Node-RED with the following parameters:


See the MongoDB documentation for a more comprehensive intro to MongoDB (OBS! Remember we’re running v2.4, not the newest).
A simple Node-RED application with an API (at 127.0.0.1:1880/api/all) could look like this (in Node-RED, paste the following at Import–>Clipboard)
[{"id":"549e74e9.ab618c","type":"mongodb","z":"117df726.ee8209","hostname":"127.0.0.1","port":"27017","db":"myDB","name":""},{"id":"fd36e356.02c92","type":"mongodb out","z":"117df726.ee8209","mongodb":"549e74e9.ab618c","name":"","collection":"myCollection","payonly":true,"upsert":false,"multi":false,"operation":"insert","x":330,"y":40,"wires":[]},{"id":"2eb97340.d1468c","type":"mongodb in","z":"117df726.ee8209","mongodb":"549e74e9.ab618c","name":"","collection":"myCollection","operation":"find","x":330,"y":100,"wires":[["a87a8357.57858"]]},{"id":"85f4461.f7a0bb8","type":"http in","z":"117df726.ee8209","name":"GET /api/all","url":"/api/all","method":"get","swaggerDoc":"","x":90,"y":100,"wires":[["2eb97340.d1468c"]]},{"id":"a87a8357.57858","type":"function","z":"117df726.ee8209","name":"Content-Type","func":"msg.headers = {\"Content-Type\" : \"application/json\"};\nreturn msg;","outputs":1,"noerr":0,"x":580,"y":100,"wires":[["25f0a04d.da0f6"]]},{"id":"25f0a04d.da0f6","type":"http response","z":"117df726.ee8209","name":"","x":730,"y":100,"wires":[]}]
You need to add a node that inserts something into the database.
Remember to click “Deploy” to make the Node-RED flow active.
2,445 thoughts on “Using Node-RED + MongoDB to gather and publish data on a Raspberry PI”