In this week you are going to get familiar with the Raspberry Pi. We will couple electronics to it, learn how to connect to them, and write simple programs in Python.
Hints:
- Today, you will only work with one Pi at a time.
- Use the Ethernet cable, keyboard and mouse in the lab and connect them to the Pi
- Re-connect the original lab computers before you leave
- Use the lockers to store your box
Connect and Start the Raspberry Pi
Goal: You can connect and startup a Raspberry Pi and work with it.
Hints:
- Use the Raspberry Pi Model 2B (the old one)
- Connect the Pi to the monitor, cable and mouse you find in the lab
Change the Password: By default, the Raspberry has a user with the username pi and the password raspberry. Once you connect the Pi to a network, everyone that can access your Raspberry via the Network can log in and do anything on that Pi, including changing user rights so that you may loose the ability to control over your Pi. Since the network in the lab is accessible also from outside, it is actually very likely that this happens. Automated bots scan for network devices, then try the pi and raspberry combination. We have actually observed this. Therefore, you need to change the default password.
Task: Search how to change the password of the Pi and do it immediately. Make sure everyone in your team knows the new password.
For the Report: How did you change the password? Are there alternative ways to do so? Ask you neighbour team!
Run Python on the Raspberry Pi
Goal: You can write, compile and run a simple Python program.
Hints:
- When you work on the Pi graphical dekstop, you can use the Python tools for editing and executing programs. This is probably simplest to begin, and works well while your Pi is connected to the monitor and keyboard. You can later also try to edit in another text editor and then start Python from the command line.
Task: Create a simple Python program that writes something to the console.
Task: Connect the speaker to the Pi and create a Python program that makes some noise via the speaker. (We need that for later.)
For the Report: Describe how you can run the Python program on the Pi, possibly even by using several ways. Include some example code and screenshots or command line snippets. (For later: You do not have to include all source code, just if it is very short, or thode code snippets that you would like to show to explain something.)
Connect via SSH
Goal: You can connect to a Raspberry Pi via SSH and operate it remotely, for instance by starting a Python program from the command line.
Hints:
- Connect the Pi via ethernet cable in the lab, so it gets a public IP address
- You need find out the IP address of the Pi. (Do this from the command line in the Pi, when it is connected to a monitor.)
- As SSH client you can use Putty on Windows. On a Mac, an SSH client is already installed.
Task: Search how to find the IP address of the Pi, and use it to connect via SSH.
Task: Start a Python program from the command line via SSH.
For the Report: Describe how you solved each step.
Detect Movement
Goal: You can connect the PIR sensor to the Pi and detect a movement by checking the signal on the cable via GPIO. You are able to create a minimal program for that.
Task:
- Power down the Pi, and connect the breadboard.
- Connect the PIR (passive infrared) sensor with three cables. Look at the model of your PIR sensor, the cabling may be different between models.
- Write a program that detects when the PIR sensor is activated. You can first let the program write something on the output console. In the end the program shoud make some noise when the PIR sensor is activated, like an alarm system.
For the Report: Describe how you solved each step. Include a photo of the setup.
Extra: (Do this if you have time, or do it at the end.) Build a program that takes a picture with the webcam once the PIR sensor detects motion.
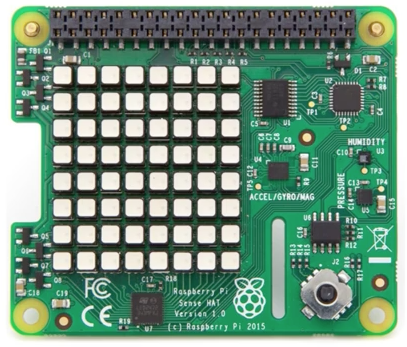
The Sense HAT
Goal: You can use all of the features of the Sense HAT in a Python program and find your way through the API description for the Sense HAT in Python.
Hints:
- Use the Raspberry Pi 3 (the new one).
- Use the new 16 GB SD-card that comes in its own packaging.
- Connect the Sense HAT to the Pi before starting.
- Also for this Pi, change the password immediately.
- The video below links to a set of example programs that you can use as inspiration to get started.
Task: Create short programs that read the values of the Sense HAT’s sensors: the temperature, humidity and barometric pressure. Get the values of the other teams and see in which range all values are.
Task: Create a simple program that scrolls text along the Sense HAT’s LEDs.
Task: Create a program that paints a picture on the LED matrix. Take a photo of it!
Links:
For the Report: Explain what your programs from above do, and include some of the code to explain how you solved the problems. You can also include photos of the Sense HAT’s LED matrix once you print something on it.
On your Own
- Decide on your own if you want or need to experiment more with the Raspberry. The goal of this first week is really that each one of you gets good at writing simple programs as the ones above and can handle them for the Pi.
- Build more programs with the Sense HAT, combining input and output. Document your program in the report.